Sass 是一个非常强大的工具,我们很多人仍在研究它的极限。我们能用它做什么,我们又能将它发挥出多大的能量?
在Hugo Giraudel抛出他的想法之后,我也非常兴奋地有一个想法——2D 图形引擎。这看上去令人困惑,因为 CSS 的缘故,Sass 早已是图形领域的一部分。其实这并非是为了内容而设计样式,我想利用 Sass 一个像素一个像素地渲染图像。输出结果可以作为 box-shaodow 值绘制在一个1×1像素的元素上。
检测策略
一种方式是遍历栅格和一系列的对象,检测像素是否需要绘制。这种策略下,Sass 将必须处理 n × width × height 的迭代量,其中 n 代表对象的数量。这么大的工作量,导致了整体性能不高,特别是还要考虑到 Sass 的循环操作本来就不快的客观条件。与渲染整个栅格的方式不同,通过获取限界框(bounding box),从而只渲染可能包含对象的部分,这种方式是可行的。查看演示。
更好的方式是使用路径。
路径可能听起来很熟悉。在 Adobe Illustrator 和 Adobe Photoshop 此类图形软件中,路径是一个非常基础的术语,令人惊奇的是在 SVG 和 HTML5 此类 web 技术中也存在这个术语。路径就是一系列坐标点的顺次连接。只需要提供一组坐标,我就可以绘制一个形状。如果你熟悉路径这个概念,那么你也可以很好的理解弯曲路径(curved paths)的概念。从现在起,我将只使用直线。
将矢量图转为位图的操作——或者我们这里所做的,将矢量路径转为box-shadow 的操作——通称为栅格化处理(rasterizing)。
扫描线算法
通常使用扫描线算法渲染路径。就我个人而言,每当听到「算法」这个词的时候,我会感到恐慌,甚至放弃当前的策略。但是这个算法非常易于理解,所以一定不要感到害怕!
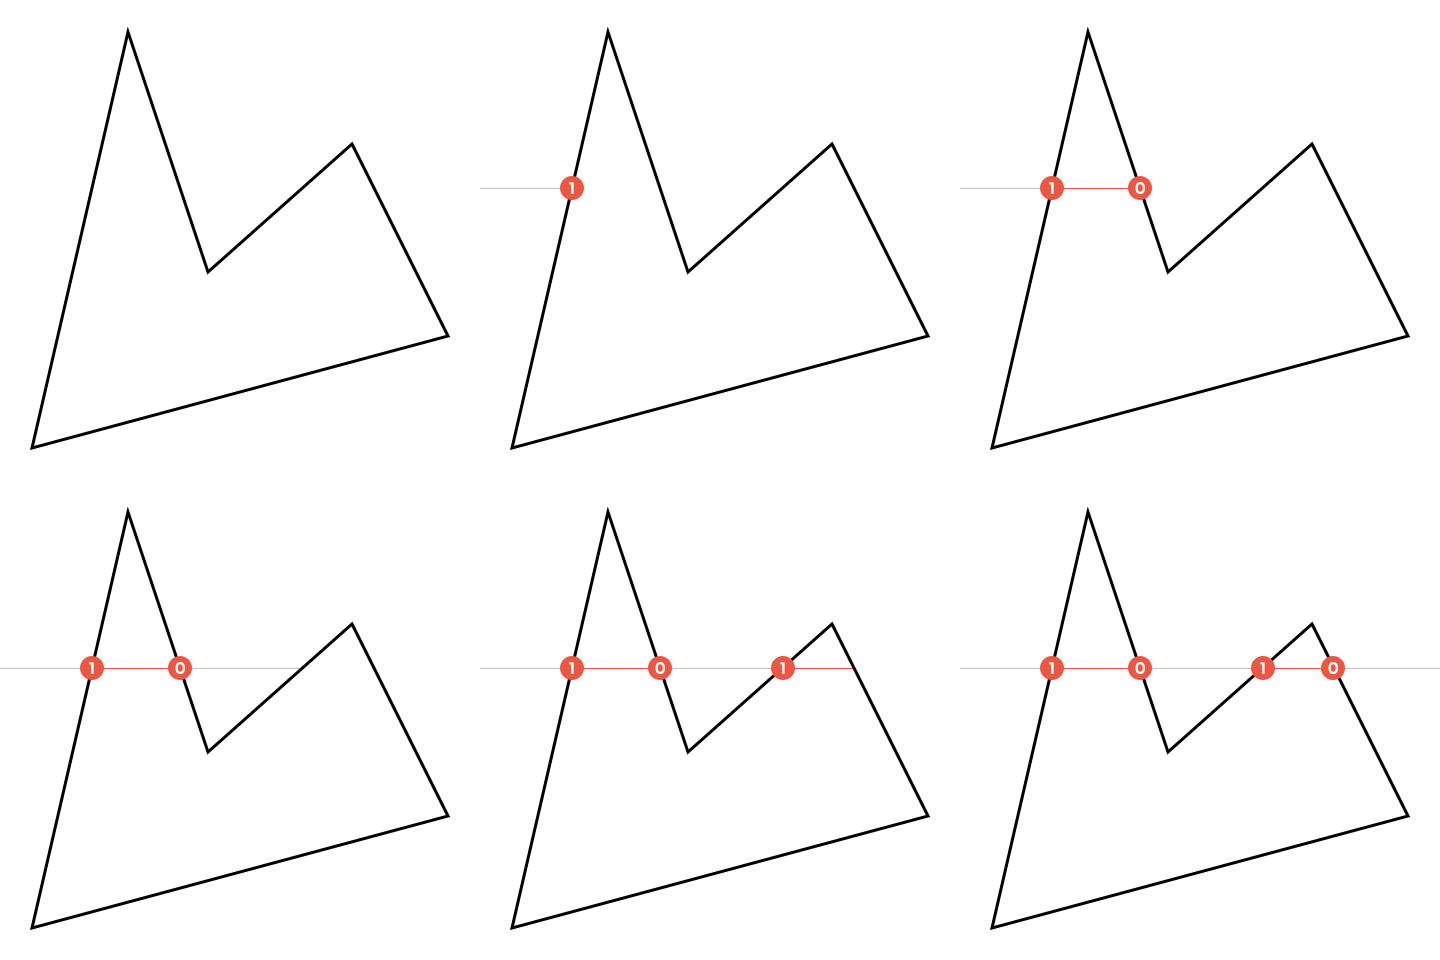
我们遍历所有垂直的像素。对于每一行,保存当前路径所有线条的交点。遍历所有线条之后,进行排序并从左到右遍历所有交点。在每一个交点处,我们交错绘制。

Sass的具体实现
在开始渲染之前,了解要渲染什么是很有用的:必须定义一个路径。我认为设定一个坐标列表是个不错的主意:
$square: (
  (0, 0), (64, 0),
  (64, 64), (0, 64)
);
这样就可以很容易地缩放和变形(移动)了:
@function scale($path, $scale) {
  @for $n from 1 through length($path) {
    $coords: nth($path, $n);

    $path: set-nth($path, $n, (
      nth($coords, 1) * $scale,
      nth($coords, 2) * $scale
    ));
  }

  @return $path;
}

@function translate($path, $x, $y) {
  @for $n from 1 through length($path) {
    $coords: nth($path, $n);

    $path: set-nth($path, $n, (
      nth($coords, 1) + $x,
      nth($coords, 2) + $y
    ));
  }

  @return $path;
}
为了渲染特定颜色,我们可能希望给函数产第一个颜色值,从而输出一系列的 box-shadow,就像这样:
$shadows: ();
// Append more shadows
$shadows: render($shadows, $square, #f00);
在render()函数中,我们必须列出新的阴影值,并返回它们。下面是render()的大体轮廓:
@function render($list, $path, $color) {
  // List to store shadows
  $shadows: ();
  // Do a lot of thinking
  @if length($shadows) > 0 {
    @return append($list, $shadows, comma);
  }
  @return $shadows;
}
为了计算需要绘制的区域,我们可以迭代路径中的所有坐标,并存储这里面y 轴的最大值和最小值。这样我们就知道了在y 轴上绘制的起点和终点。通过使用路径中的线条(将会被立即覆盖),可计算得到在 x 轴的渲染路径。
// Initial values
$top: null;
$bottom: null;

@each $coord in $path {
    $y: nth($coord, 2);

    // @if $top is still null, let's set current value
    // @else get the smaller value between previous y and current y
    @if $top == null { $top: $y; }
    @else { $top: min($y, $top); }

    // Same thing for the bottom, but get the largest value instead
    @if $bottom == null { $bottom: $y; }
    @else { $bottom: max($y, $bottom); }
}
掌握路径的垂直边界,我们可以通过迭代行,来计算当前路径的线条交点。然后对交点进行排序,确保绘制的正确性。稍后我们会重温整个绘制逻辑。
// If there is something to draw at all
@if $bottom - $top > 0 {
  // Iterate through rows
  @for $y from $top through $bottom {
    // Get intersections
    $intersections: intersections($path, $y);

    @if type-of($intersections) == 'list' and length($intersections) > 0 {
        $intersections: quick-sort($intersections, 'compare');

        // Drawing logic
      }
    }
  }
}
intersections($path, $y)函数的功能是获取在特定 y 坐标处路径的交点。该函数的大体轮廓相当简单。我们通过迭代路径,以查找每一行的交点。最后,返回这些交点的列表。
@function intersections($path, $y) {
  $intersections: ();
  $length: length($path);

  // Iterate through path
  @for $n from 1 through $length {
    // Intersection algorithm here
  }

  @return $intersections;
}
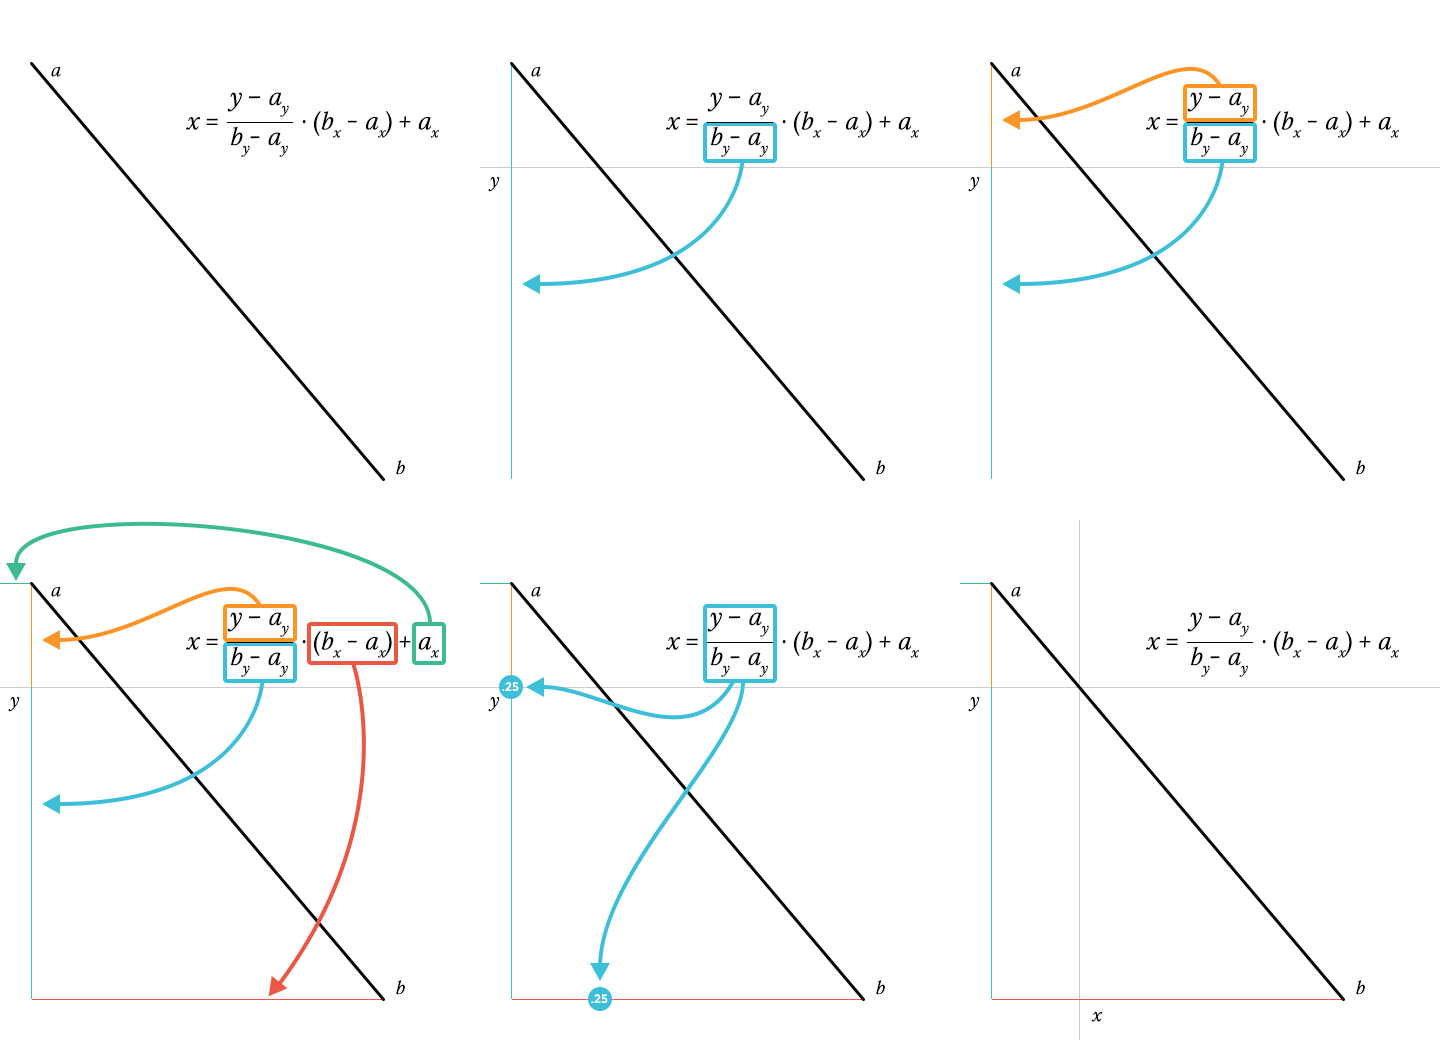
此处先暂停一下 Sass 的编写。获得一条线的交点是个棘手的问题。通过(by – ay)获得直线的垂直高度后,我们可以通过(y – ay / height)判定 y 坐标的的位置。结果应该是一个在0到1闭区间的数字。如果不在这一数字范围内,那么就不是与该线的交点。
因为直线坐标是符合一次线性函数的,所以我们可以用这个数字乘以直线的水平宽度(bx – ax),那么就可以得到与这条线的位置相关的x 坐标。所有这些的结果加上直线的水平位置(… + ax),就可以得到最后的 x 坐标了。
译者注:以上两段可以总结为这样一道数学题:给出线段
AB及其端点坐标(ax,ay)和(bx,by),另外知道一点的纵坐标y,请先判断y是否有可能在AB线段上,如果在,求出这一点的完整坐标

回到 Sass 上来,让我们实现上述想法:
// Get current and next point in this path, which makes a line
$a: nth($path, $n);
$b: nth($path, ($n % $length) + 1);

// Get boundaries of this line
$top: min(nth($a, 2), nth($b, 2));
$bottom: max(nth($a, 2), nth($b, 2));

// Get size of the line
$height: nth($b, 2) - nth($a, 2);
$width: nth($b, 1) - nth($a, 1);

// Is line within boundaries?
@if $y >= $top and $y <= $bottom and $height != 0 {
  // Get intersection at $y and add it to the list
  $x: ($y - nth($a, 2)) / $height * $width + nth($a, 1);
  $intersections: append($intersections, $x);
}
对于绘制逻辑,大家可以查看第一个扫描线算法的演示动画。如你所见,绘制了交点1到交点2中间的区域,交点3到交点4之间的区域,如此类推。
对于每个交点,我们交错绘制。然后,我们只需要将像素填充为$shadows。
// Boolean to decide whether to draw or not
$draw: false;

// Iterate through intersections
@for $n from 1 through length($intersections) {
  // To draw or not to draw?
  $draw: not $draw;

  // Should we draw?
  @if $draw {
    // Get current and next intersection
    $current: nth($intersections, $n);
    $next: nth($intersections, $n + 1);

    // Get x coordinates of our intersections
    $from: round($current);
    $to: round($next);

    // Draw the line between the x coordinates
    @for $x from $from through $to {
      $value: ($x + 0px) ($y + 0px) $color;
      $shadows: append($shadows, $value, comma);
    }
  }
}
结论
让我们回顾一下刚刚到底发生了什么:
- 定义路径
- 创建限界框的路径
- 迭代限界框的
y轴 - 在路径中获得所有线条的交点
- 根据
x坐标排序交点 - 迭代交点
- 对于每个奇数交点,执行绘制操作,直到遇到下一个交点
- 输出结果
那么,这有用吗?并不大。性能表现非常不好。渲染一些基础对象都要话费几分钟的时间。LibSass 可以减少这种痛苦,使其可以接受。但是我们是在开玩笑吗?如果你打算渲染矢量路径,可以去使用 SVG,Canvas 甚至 WebGL。所有的这些都可以帮你实现栅格化,并且可以让你拥有更多样的选项和更好的性能。
这里所做的是可以证明,Sass 是非常强大的,可以天马行空地去使用它。Any application that can be written in Sass, will eventually be written in Sass.
本文根据@Tim Severien的《Vector Graphics in Sass》所译,整个译文带有我们自己的理解与思想,如果译得不好或有不对之处还请同行朋友指点。如需转载此译文,需注明英文出处:http://www.sitepoint.com/vector-graphics-sass/。
出处:http://www.w3cplus.com/preprocessor/vector-graphics-sass.html